Planning a vacation can feel like herding adorable but chaotic kittens—so many moving parts, so many details to track! While there are plenty of travel apps out there, nothing beats the flexibility and customization of a well-designed Google Sheet for organizing your next adventure. It’s time to make your vacation planning spreadsheet.
Today I’m sharing my step-by-step process for creating a vacation planning spreadsheet that’s both functional AND cute (because why settle for boring spreadsheets?). This system has saved me countless hours and prevented those “Wait, did I book that?” panic moments! Now onto creating a vacation planning spreadsheet!
Why Google Sheets is Your Vacation Planning BFF
Before we dive into the tutorial, let’s talk about why Google Sheets should be your go-to vacation planning tool:
- Accessible anywhere (even offline with the mobile app)
- Shareable with travel companions for collaborative planning
- Customizable to YOUR specific trip needs
- Automatic calculations for budgeting (no math required!)
- Version history in case someone accidentally deletes something important
- Free to use (more money for souvenirs!)
Now, let’s transform a blank spreadsheet into your vacation command center!
Step 1: Set Up Your Sheet Structure
First, we’ll create a multi-tab system to organize different aspects of your trip:
- Create a new Google Sheet
- Rename the first tab “Trip Overview”
- Add these additional tabs:
- Budget Tracker
- Accommodation
- Transportation
- Activities & Sightseeing
- Packing List
- Important Info
Pro Tip: Use tab colors to create a cute rainbow effect or match your trip theme (beach blues for a coastal vacation, cherry blossoms pink for Japan, etc.)!
Step 2: Design Your Trip Overview Dashboard
The Trip Overview tab will be your at-a-glance dashboard. Let’s set it up:
- Create a header section with:
- Trip name
- Destination
- Dates
- Trip countdown formula:
=DATEDIF(TODAY(), [start date cell], "D") & " days until takeoff!"
- Add a “Trip Stats” section with:
- Total budget
- Amount spent (we’ll pull this with a formula later)
- Remaining budget
- Number of accommodations
- Number of planned activities
- Create a mini-itinerary table with columns:
- Date
- Day of Week (formula:
=TEXT([date cell], "dddd")) - Location
- Accommodation
- Main Activities
Here’s the formula magic to make this dynamic:
=ARRAYFORMULA(IF(ROW(A2:A15)<=DATEDIF([start date], [end date], "D")+1, [start date]+ROW(A2:A15)-1, ""))This automatically populates your date column based on your trip start and end dates!

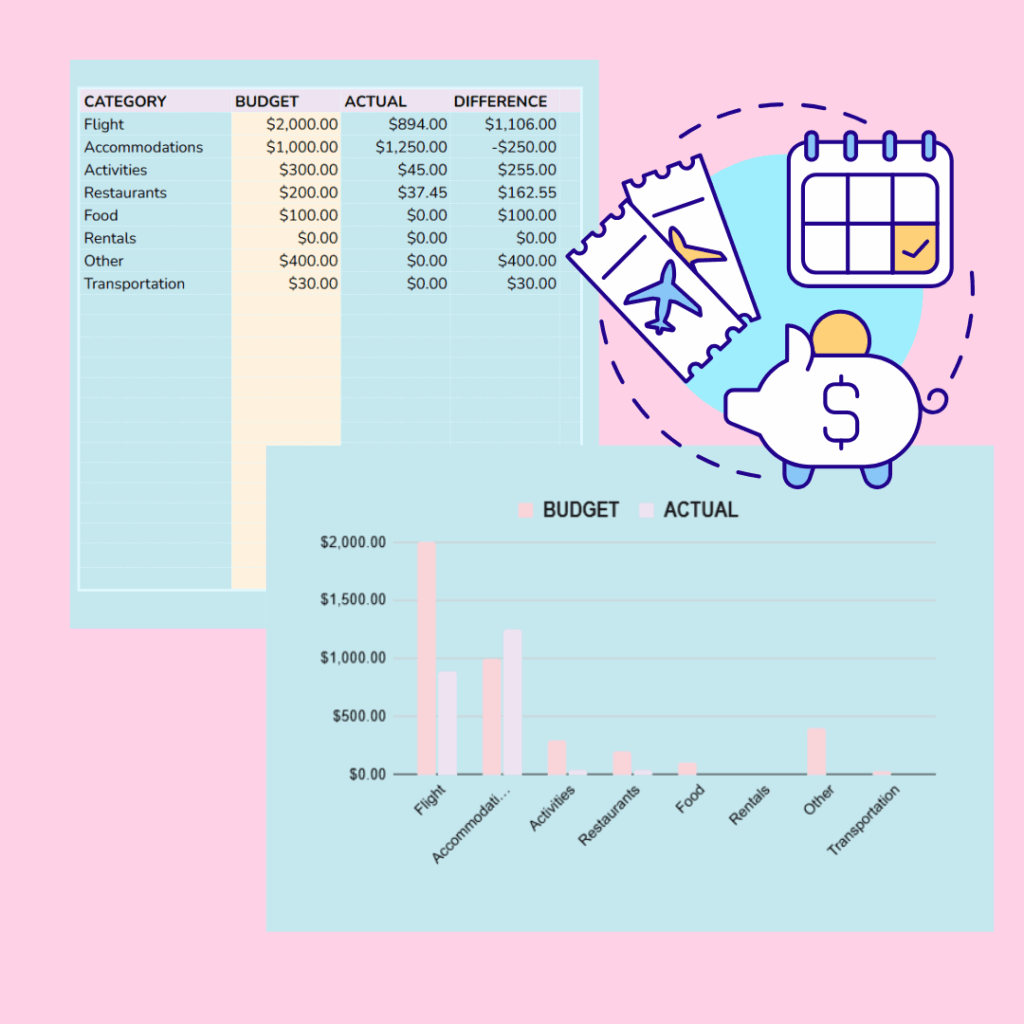
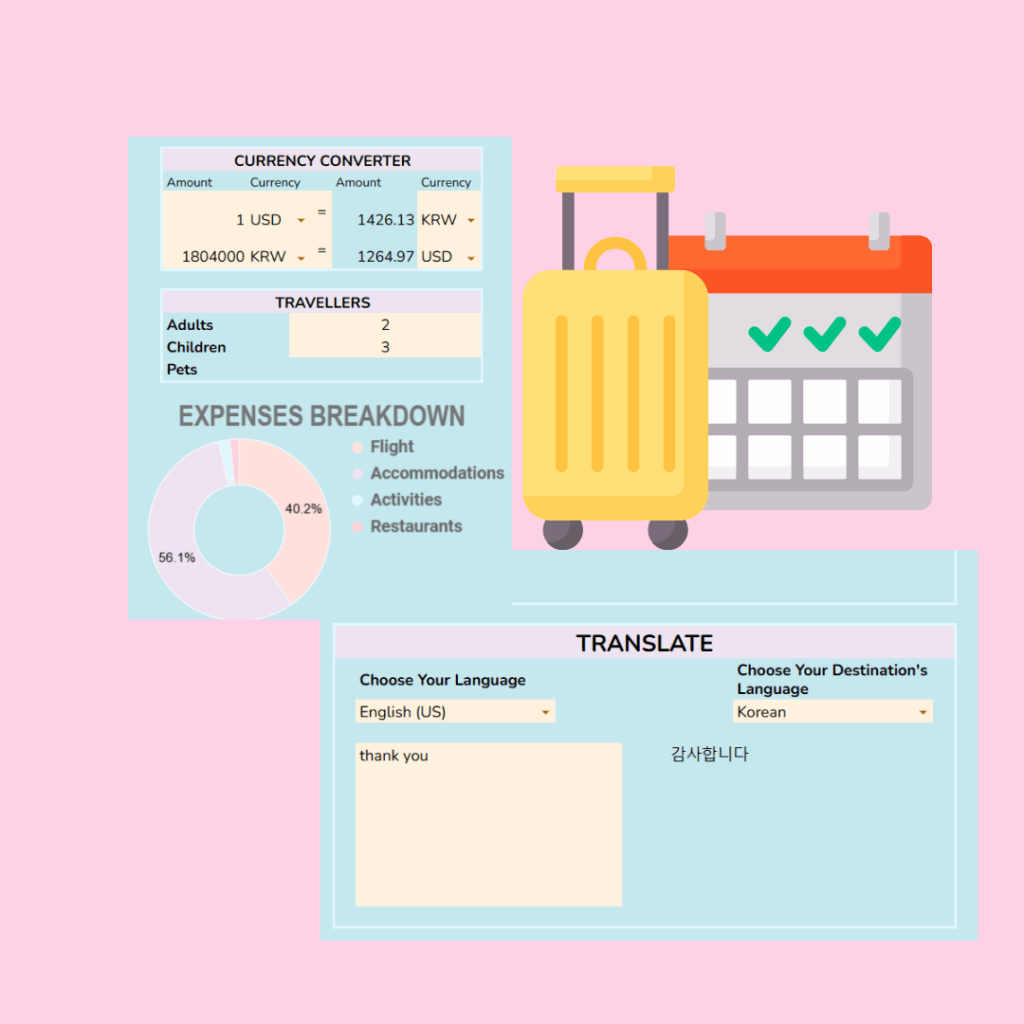
Step 3: Build a Beautiful Budget Tracker
The Budget tab is where the real spreadsheet magic happens:
- Create expense categories relevant to your trip:
- Flights/Transportation
- Accommodations
- Food & Dining
- Activities & Tickets
- Shopping
- Emergency Fund
- For each category, include columns for:
- Item Description
- Estimated Cost
- Actual Cost
- Date Paid
- Payment Method
- Notes
- Add these formulas at the bottom:
- Total Estimated:
=SUM(B2:B50) - Total Actual:
=SUM(C2:C50) - Remaining Budget:
=[Total Budget Cell]-[Total Actual Cell]
- Total Estimated:
- Create a pie chart to visualize spending by category using:
- Select your category names and actual costs
- Insert > Chart
- Choose “Pie Chart”
- Customize colors to match your kawaii aesthetic!
Cute Tip: Use conditional formatting to make cells turn pink when you’re close to exceeding category budgets! Just select your “Actual Cost” column and apply: Conditional formatting > Greater than or equal to > [90% of your budget]
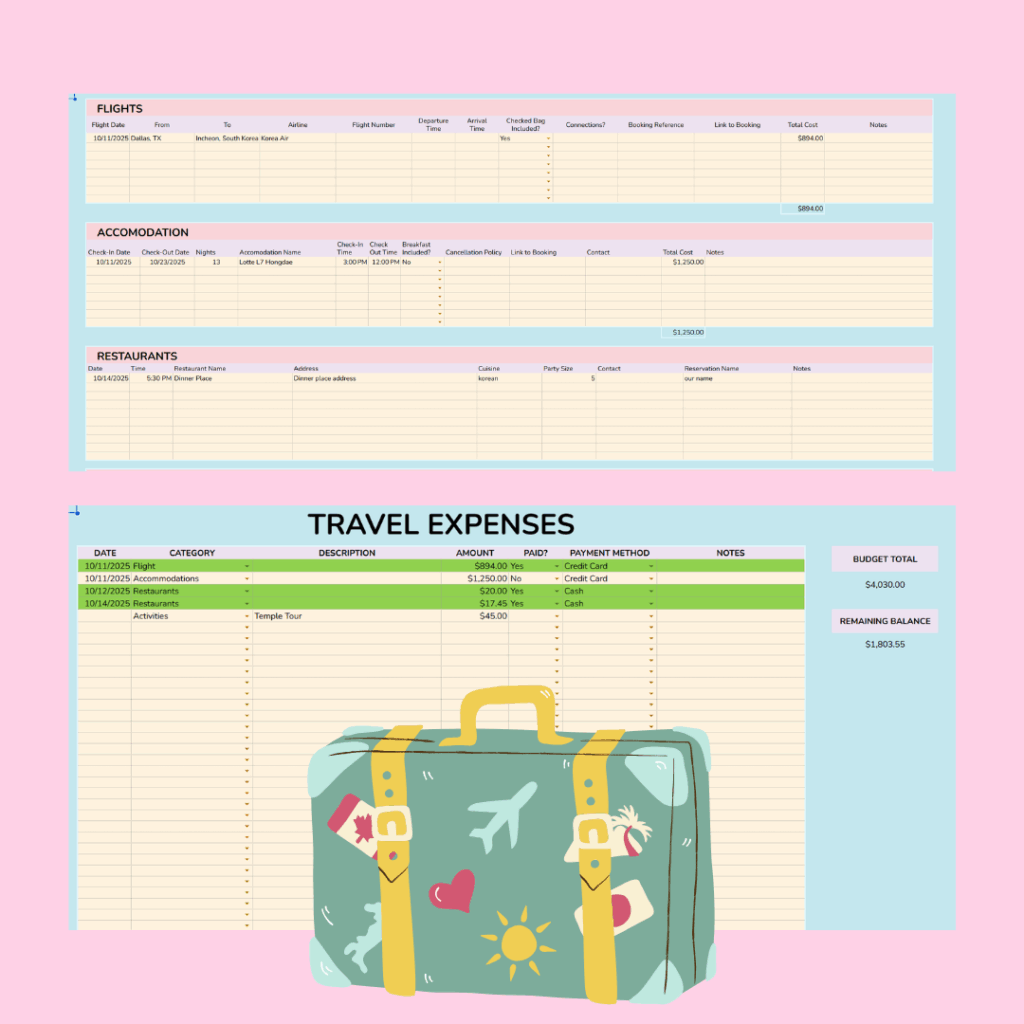
Step 4: Create an Accommodation Tracker
Let’s organize where you’ll be staying:
- Set up columns for:
- Check-in Date
- Check-out Date
- Accommodation Name
- Confirmation #
- Address
- Check-in Time
- Cost
- Amenities
- Notes
- Add data validation for status tracking:
- Create a new column called “Status”
- Add data validation with dropdown options: “Researching,” “Booked,” “Paid,” “Canceled”
- Apply conditional formatting to change the row color based on status
Step 5: Design Your Transportation Tracker
Keep all your travel arrangements organized:
- Create columns for:
- Date
- Type (flight, train, etc.)
- From/To
- Departure Time
- Arrival Time
- Confirmation #
- Cost
- Notes
- For flights, add columns for:
- Terminal/Gate
- Seat Assignment
- Baggage Allowance
- Check-in Reminder (24h before flight)
Step 6: Build an Interactive Packing List
Create the ultimate packing checklist:
- Organize by categories:
- Clothing
- Toiletries
- Electronics
- Travel Documents
- Miscellaneous
- Create columns for:
- Item Name
- Quantity
- Packed? (checkbox format)
- Notes
- Add a progress bar with this formula at the top:
="Packing Progress: " & COUNTIF([packed column range], TRUE) & "/" & COUNTA([item column range]) & " (" & INT(COUNTIF([packed column range], TRUE)/COUNTA([item column range])*100) & "%)"- Add conditional formatting to show completed items in light green
Step 7: Add Cute Formatting Touches
A vacation planner should spark joy! Let’s make it kawaii:
- Add custom header images related to your destination
- Use a fun Google Fonts combination (Settings > Font)
- Create a consistent color scheme across all tabs
- Add emojis to tab names and section headers
- Use borders and cell shading to create visual organization
- Insert small decorative elements in unused corners
Google Sheets Pro Tip: Did you know you can insert emojis using the keyboard shortcut WIN + . (period) on Windows or CTRL + CMD + Space on Mac?
Step 8: Make It Mobile-Friendly
Ensure your spreadsheet works well on your phone during the trip:
- Test on mobile and adjust column widths
- Freeze the top row and important columns
- Create simplified “Mobile View” tabs if needed
- Set up offline access in the Google Sheets app
Bonus: Smart Formulas for Travel Planning
These formulas will take your vacation spreadsheet to the next level:
- Currency Converter:
=GOOGLEFINANCE("CURRENCY:"&[currency code 1]&[currency code 2], "price") * [amount cell] - Days Until Trip:
=DATEDIF(TODAY(), [start date cell], "D")
Save Hours with a Ready-Made Template
If this all sounds amazing but also like a lot of work to set up from scratch, I’ve got good news! After years of refining my travel planning spreadsheets, I’ve created the Premium Matcha Budget Tracker that includes a dedicated travel planning module with all these features ready to use!
![Preview of Premium Matcha Budget Tracker with kawaii elements]
With my template, you’ll get:
- Pre-built formulas and calculations
- Custom data validation tools
- Beautiful charts and visualizations
- Kawaii design elements
- Mobile-friendly layout
- Free updates for life!
Get the Premium Matcha Budget Tracker →
If you’re planning a more complex trip, you might also love my Ultimate Travel Planning Workbook which combines spreadsheet functionality with comprehensive planning pages for every aspect of your journey!
Your Turn!
What’s your biggest spreadsheet challenge when planning vacations? Let me know in the comments and I might create a tutorial specifically for that problem!
And if you create your own vacation planning spreadsheet using these tips, I’d love to see it! Share a screenshot in the comments (just be sure to blur any personal details).
Happy planning!
This post contains links to products I’ve created. As always, I only recommend tools I personally use and love!